13. Designing an Address Model
Depending on the merchant’s needs, the business model and the catchment area of the site, the used
address models may vary widely. Since django-SHOP allows to subclass almost every database model,
addresses are no exception here. Therefore the class shop.models.address.BaseAddress does
not provide any defaults, except for a foreign key to the Customer model and a priority field used
to sort multiple addresses by relevance.
13.1. Create a Customized Address Model
All the fields which make up an address, such as the addressee, the street name, zip code, etc. are part of the concrete model implementing an address. It is the merchant’s responsibility to define which address fields are required for the site’s needs. Therefore the base address model does not contain any address related fields, they instead have to be declared by the merchant.
A concrete implementation of the shipping address model may look like this, which not really by coincidence is similar to the address model as shipped by default (see below).
from shop.models.address import BaseShippingAddress, ISO_3166_CODES

class ShippingAddress(BaseShippingAddress):
    name = models.CharField("Full name", max_length=1024)
    address1 = models.CharField("Address line 1", max_length=1024)
    address2 = models.CharField("Address line 2", max_length=1024)
    zip_code = models.CharField("ZIP / Postal code", max_length=12)
    city = models.CharField("City", max_length=1024)
    country = models.CharField("Country", max_length=3,
                               choices=ISO_3166_CODES)
    class Meta:
        verbose_name = "Shipping Address"
        verbose_name_plural = "Shipping Addresses"
Since the billing address may contain different fields, it must be defined separately from the shipping address. To avoid the duplicate definition of common fields for both models, use a mixin class such as:
from django.db import models
from shop.models.address import BaseBillingAddress

class AddressModelMixin(models.Model):
    name = models.CharField("Full name"), max_length=1024)
    address1 = models.CharField("Address line 1"), max_length=1024)
    # other fields

    class Meta:
        abstract = True


class BillingAddress(BaseBillingAddress, AddressModelMixin):
    tax_number = models.CharField("Tax number", max_length=50)

    class Meta:
        verbose_name = "Billing Address"
        verbose_name_plural = "Billing Addresses"
13.1.1. The Default Address Model
The simplest way is to materialize the required address classes, is to use them from our default
and convenience models: shop.models.defaults.address.ShippingAddress and
shop.models.defaults.address.BillingAddress. Before using them, we check if they
fulfill your requirements. Otherwise we create our own address models inheriting from
shop.models.address.BaseAddress.
Note
After changing the address model, remember to create a database migration of the merchant implementation, and apply it.
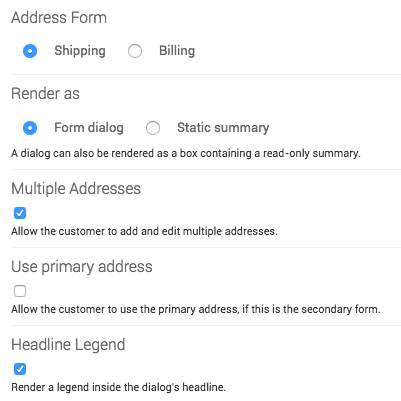
13.2. Multiple Addresses
In django-SHOP, if the merchant activates this feature, while setting up the site, customers can register more than one address. Using the Checkout Address Form Plugin, we can enable this feature.
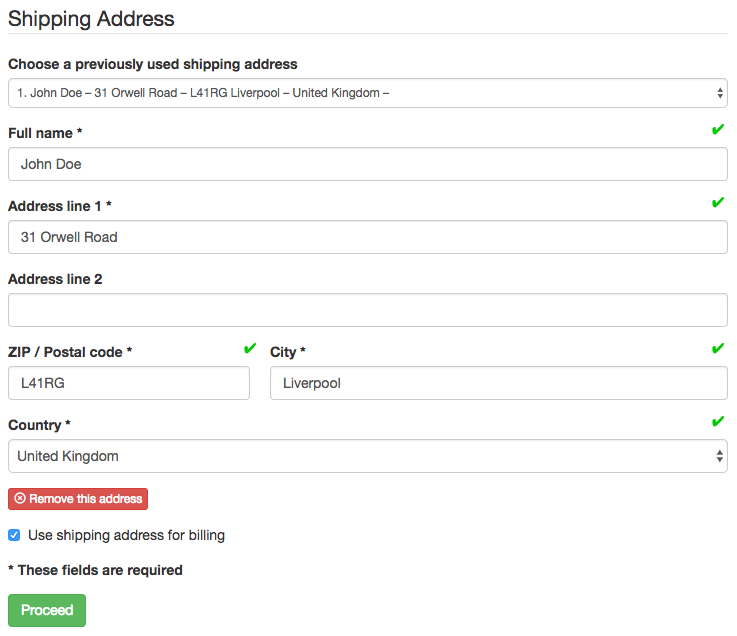
Now during checkout, the customer can select one of a previously entered shipping- and billing addresses, or if he desires add a new one to his list of existing addresses.
13.3. How Addresses are used
Each active Cart object refers to one shipping address object and/or one billing address
object. This means that the customer can change those addresses whenever he uses the supplied
address forms.
However, when the customer purchases the content of the cart, that address object is converted into
a simple text string and stored inside the then created Order object. This is to freeze the
actual wording of the entered address. It also assures that the address used for delivery and
printed on the invoice is immune against accidental changes after the purchasing operation.
By adding a template named myshop/address.txt for both address models, or
myshop/shipping-address.txt and myshop/billing-address.txt for each of them, the merchant
can define how the address shall be rendered on fulfilled orders.
13.3.1. Address Formatting
Whenever the customer fulfills the purchase operation, the corresponding shipping- and billing address objects are rendered into a short paragraph of plain text, separated by the newline character. This formatted address then is used to print address labels for parcel delivery and printed invoices.
It is the merchant’s responsibility to format these addresses according to the local practice.
A customized address template must be added into the merchant’s implementation below the
templates folder named myshop/shipping_address.txt or myshop/billing_address.txt.
If both address models share the same fields, we may also use myshop/address.txt as a fallback.
Such an address template may look like:
{{ address.name }}
{{ address.address1 }}{% if address.address2 %}
{{ address.address2 }}
{% endif %}
{{ address.zip_code }} {{ address.city }}
{{ address.get_country_display }}
This template is used by the method as_text() as found in each address model.
13.4. Use Shipping Address for Billing or vice versa
Most customers use their shipping address for billing. Therefore, unless you have really special needs, it is suggested to share all address fields required for shipping, also with the billing address. The customer then can reuse the shipping address for billing, if he desires to. Technically, if the billing address is unset, the shipping address is used anyway, but in django-SHOP the merchant has to actively give permission to his customers, to reuse this address for billing.
The merchant has to actively allow this setting on the site, while editing the Address Form Plugin.
Warning
If the merchant allows to use the shipping address for billing and vice versa, then if the customer selects both options, we end up having no address at all. It therefore is strongly recommended, that one address acts as primary, and that the option “Use primary address” is checked only on the secondary one.
13.5. Address Forms
The address form, where customers can insert their address, is generated automatically and in a DRY
manner. This means that whenever a field is added, modified or removed from the address model, the
corresponding fields in the address input form, reflect those changes and without any additional
programming. When creating the form template, we have to write it using the as_div() method.
This method also adds automatic client-side form validation to the corresponding HTML code.
13.5.1. Address Form Styling
One problem which remains with automatic form generation, is how to style the input fields.
Therefore, django-SHOP wraps every input field into a <div>-element using a CSS class named
according to the field. This for instance is useful to shorten some input fields and/or place it
onto the same line.
Say, any of our address forms contain the fields zip_code and location as shown in the
example above. Then they may be styled as
.shop-address-zip_code {
  width: 35%;
  display: inline-block;
  padding-right: 10px;
}

.shop-address-city {
  width: 65%;
  display: inline-block;
  padding-left: 10px;
}
so that the ZIP field is narrower and precedes the location field on the same line.
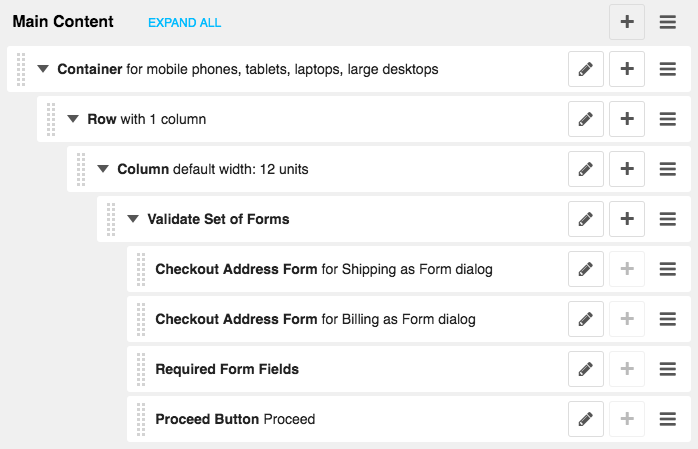
13.6. Arranging Address Forms
Typically, we ask the customer during the checkout process, for his shipping and/or billing addresses. This however is completely up to the merchant; from a technical point of view, the step when to ask the customer for his addresses is completely arbitrary and can be skipped at all for shops which exclusively ship only virtual goods.
Good practice however is, to add the shipping and billing forms on the checkout process. Since we want to ensure that a customer must enter a valid address, we wrap the address forms into a so called Validate Set of Forms Plugin. This inhibits a customer to proceed to the next page and hence to the purchasing step, whenever at least one form did not validate.
13.7. Technical Details
Each entered and validated shipping- and billing address address is associated with the current cart. This means that the given addresses then are used while fulfilling the purchasing step. Additionally, each address belongs to the customer which entered it. If multiple addresses are enabled, then django-SHOP assigns a priority to each of the entered addresses in ascending order. A customer then can select one of a previously entered address.
13.8. Further Reading
A good introduction on which fields to use where and when in addresses can be found at http://www.uxmatters.com/mt/archives/2008/06/international-address-fields-in-web-forms.php